Thursday, December 27, 2012

Dining at Downton: How to serve plum pudding


We had a relatively quiet Christmas here in Ohio, seeing family and telling funny stories and going for long, snowy walks and eating good food. As per tradition, we served plum pudding for dessert on Christmas night, along with a lot of other treats (frosted cookies, red velvet cake, petit fours...). We don't mess around with dessert.

As I mentioned a few days ago, the serving of plum pudding is half the fun. Once you've steamed the pudding so it's nice and hot (2 hours at 350 degrees, back in the mold and the double boiler you set up to cook it the first time), you turn the pudding out into a heat-resistant dish. Heat up a little brandy on the stove, pour it evenly over the pudding, and hold a lit match close to the pudding. The fumes from the brandy should pick the flame right up and set the whole pudding alight. In a darkened room with all the family sitting around a candle-lit table, there's nothing quite like it: blue flames dancing around the dish, creating a magical feeling.


Unfortunately, our evening did not go exactly according to plan.

The brandy we ended up using was just too old, so the flames died out almost immediately. Here is the only picture we could get of bringing the pudding to the table--if you look closely, you might see the blue flames as they dwindled to nothing.


That doesn't mean the pudding wasn't delicious, though! The days it spent ripening in the cold did it good, and the pudding was light and fruity with a citrusy zing. It had a tender, spongy crumb that contrasted well with dabs of rich hard sauce.

If you celebrated the holidays this December, I hope you enjoyed equally delicious food and fun company. (I also hope that your projects went a little more according to plan than mine!)


Previously:

Monday, December 24, 2012

Dining at Downton: How to steam plum pudding

On Saturday we talked about how to make your own plum pudding, the most classic of British holiday desserts. (Yes, I am still wondering where the plums are in the recipe.) Today we'll discuss the cooking process, which is a rather elaborate steaming method. It requires parchment paper, cooking twine, a water bath, and lots of patience.

My dad was fascinated by the process from start to finish. He's an engineer by trade, and he's the kind of cook who loves the science of the kitchen. He will turn out renditions of his mother's pumpkin pie recipe until he has the ingredient ratio just right (much to my mom's dismay). He will collect recipes for beef bourgignon and combine instructions from each to make the best possible stew. He will then exchange observations on the proper way to brown beef with me over the phone. (He also went to great lengths to find out why the one American manufacturer of plum pudding stopped producing it, which is how I ended up making the pudding in the first place.) Put simply, my dad likes method.

"You should take photos of that!" he said as I removed the steaming pudding from the water bath. "And how did you tie the parchment paper down again?"

As he noted, this is a delicate process. So here are your highly expert instructions, just the way my dad likes them.

Step One
Preheat the oven to 350 F.

Once your pudding is mixed and ready to cook, turn the mixture into a well-greased pudding mold or glass bowl. Remember, a pudding mold looks like a Bundt pan, with a ring in the middle to ensure proper steaming. I got mine at Stock, a lovely little cooking shop that recently opened in Providence.


Step Two
Next, cut a piece of parchment paper to cover the top of the mold. Leave about six inches of overhang on all sides of the mold. Fold the paper twice in the middle to create a slight overlay--this will allow steam to accumulate without tearing the paper.

Step Three
Cover the mold with the parchment paper and use a length of cooking twine to tie the paper to the mold, just below the rim. Trim excess paper.


Step Four
Create a handle for the mold, so you can lift it out of the steam bath. Cut a long length of cooking twine and wrap it around the mold as though wrapping a present, laying the twine flat across the top, bringing it down the sides of the mold and crossing underneath. Bring the twine up to the top again on the empty sides of the mold, and slide the twine underneath the cross line on top of the parchment paper. Tie the ends of the string together to create a looped handle.


Step Five
Pour hot tap water into a large stockpot or Dutch oven (I used the latter) that can accommodate the mold with at least an inch of space on all sides. Fill with water so the oven is about 1/3 full. Place the prepared mold in the Dutch oven and cover the whole thing with the oven lid. Put in the oven to steam for about 3 hours. It will make your house smell like citrus and deliciousness.


Step Six
Periodically check the oven to make sure the water hasn't evaporated completely. You may need to pour in more water. When the pudding pulls away from the sides of the mold (about 3 hours), it's done. Carefully remove from the water bath using the string handle, and lift up the parchment paper to make sure the pudding is ready. Cool in the mold completely before turning out onto a plate.

Step Seven
Now that the pudding has cooked, you can eat it straight away or let it ripen over time. If you choose to let it sit, cover the cooled pudding and store in a cool, dark place (we put it in our 1960s-era bomb shelter) until ready to eat. Pudding will keep for at least five weeks. Be sure to warm it before serving by replacing it in the mold or bowl, then steaming for about 2 hours at 350 F.

The very last segment of this culinary adventure is my favorite: setting the pudding on fire at the table! Check back in a few days for photos of our own flaming pudding. (If you want to serve your own pudding before then, warm a small amount of brandy on the stove, then pour over the warm pudding. Immediately hold a lit match close to the pudding, and the brandy will catch on fire. Bring to the table in a darkened room for maximum effect and applause. Once the flames have died, serve with brandy butter or hard sauce.)

Note: It's possible to steam the pudding with a Crockpot instead of in the oven. See this page for complete instructions.


Works cited: Irish American Mom. Pittsburgh Post-Gazette.

Saturday, December 22, 2012

Dining at Downton: How to make plum pudding

This time of year, my family is all about tradition. Previously I wrote about the Brunswick stew we've kept from my mom's side of the family, though I tested out a Williamsburg variation of the recipe. That's still on the menu this year. My sister and I maintain important traditions like decorating the tree while listening to a BBC dramatization of Hercule Poirot's Christmas (because nothing says the holidays like a murder mystery), and she will read the January issue of Vogue on Christmas Eve. Our family is still adjusting to some major changes that took place this year, but we're determined to maintain the key rituals. How else will we know it's Christmas?

Vital to our Christmas Day dinner is the plum pudding. Another hold-over from my mom's side of the family, it draws on our English heritage and recalls the classic Charles Dickens Christmas. If you haven't tried plum pudding before, it's basically a soft cake filled with dried fruit, nuts, and (most importantly) booze. It's so historical that a mention of plum pudding first appeared in 14th-century England. 14th-century! That's 1300. Clearly, England has had plenty of time to perfect the recipe. The "modern" version of plum pudding, complete with dried fruit and suet (beef fat), probably came to England with Prince Albert when he married Queen Victoria in the 19th century.


So the Crawleys definitely would have served this kind of plum pudding at their Christmas feast. Mrs. Patmore would have begun the cooking process five weeks before Christmas, since it's an elaborate pudding (the British term for "dessert") that requires a lot of time and energy. Additionally, it's the kind of dessert that tastes the best when it's been around for a few weeks--that way the dried fruit can absorb the alcohol and the whole pudding gets nice and brandified. The alcohol also gives it a long shelf life, so you just need to let it sit in a cool, dark place. Traditionally, cooks made their puddings on the Sunday right before Advent, known as "Stir Up Sunday." (This is such a tradition that the Telegraph, a U.K. newspaper, published an article a few years ago about how few British citizens make their own puddings now. The horror!)

I am not nearly as well-prepared as Downton's cook, so I made mine on Saturday afternoon. It won't be quite as tasty with only a few days of ripening time, but we'll still enjoy it. You can even make yours the day of. Today you'll read about the preparation process, but I'll save the cooking process for a separate post. (I meant it when I said this was an involved recipe.)


Some notes before we begin:

  • You'll need a pudding mold to turn the batter into once it's ready. A pudding mold looks a lot like a Bundt pan, but it's ceramic or glass rather than metal. A Bundt pan, I have been assured, will not work. If you don't have a pudding mold, an oven-safe glass bowl will do the trick.

  • I adapted a recipe from a French classic that Mrs. Patmore certainly referred to (what with the Edwardians' obsession with French food). The changes are few but important.

    • First, I substituted butter for the suet. I was all set to use actual beef fat, but my mom was hesitant. Butter does just as well.

    • Second, I cut the ingredients in half, and it still produced way more batter than I was prepared for. Be sure to have a few glass bowls on hand in case your designated mold is filled too early.

my pudding mold

But don't be scared! Plum pudding just takes some careful preparation, and it's well worth the effort. Think of it as a culinary adventure!


Plum Pudding
(adapted from Escoffier: Le Guide Culinaire)

1 cup + 2 tbsp butter (or chopped beef suet)
1 cup + 2 tbsp breadcrumbs (I used leftover bread)
2/3 cup all-purpose flour
2/3 cup peeled, chopped apple
2/3 cup mixed raisins and sultanas
2/3 cup brown sugar, packed
2 tbsp chopped, crystallized orange peel (I used leftover orangettes)
2 tbsp ground ginger
1/2 tsp ground cinnamon
1/4 tsp ground nutmeg
1/4 tsp ground cloves
2 eggs, beaten
2/3 cup stout (I used Guinness)
1/3 cup brandy
juice and zest of 1/4 lemon and 1/4 orange

First:
Soak the raisins and sultanas in the brandy. You can do this overnight or an hour or two before preparing the mixture.

Second:
Prepare all the other ingredients. If using butter, melt over low heat. If using beef suet, chop it up into small pieces.

Mix the flour, breadcrumbs, brown sugar, and spices together in a large bowl. Then add the apple, crystallized orange peel, and citrus zest. Mix well. Finally, add the citrus juice, butter, eggs, and soaked raisins together with the remaining brandy. Add the stout at the very end, and mix until just incorporated.

Third:
Pour the batter into buttered pudding molds or glass bowls, filling until about 2/3 full. Stay tuned for the next post, where we cook the pudding!


Works cited: The Telegraph.

Tuesday, December 18, 2012

Dining at Downton: Mulled wine

It's getting to be that time when I start glancing at the calendar to see how many days are left. Not before Christmas (though that's another kind of concern) but before the premiere.

Yes, you know. The U.S. premiere of Downton Abbey Season Three.

January 6! That's less than a month away!

Josh and my sister and I can barely contain our excitement. I will probably need to review the first two seasons before that fated day in order for the story to be completely fresh in my mind. This kind of viewing--leisurely, paced, because I already know what happens--calls for something special to spice it up.

I'm talking mulled wine.

This recipe is particularly appropriate for the Downton Christmas special. I can imagine the Crowleys sipping mugs of spiced, mulled wine by the fire while they discuss the punch-up between Matthew and Sir Richard. Perhaps Mary and Matthew warmed themselves up with a tipple after their mutual declarations of love. It's the perfect thing for a cold, blustery evening, even if your winter's night features only British TV dramas and central heating. (I really do appreciate the modern comforts of home.)

I recently brewed a batch of mulled wine for a holiday party, pulling inspiration from Escoffier: Le Guide Culinaire (a cookbook Mrs. Patmore probably used) as well as from the latest issue of Bon Appetit. The Escoffier recipe is fairly mild, calling for only "zest of 1 lemon, a small piece of cinnamon and mace and 1 clove." I suppose a light hand with the spice makes sense, given the famed Victorian aversion to flavor. Since modern tastes are more adventurous, I added a few more cloves, some tangerines, and orange peel to boot. The result, I think, was well worth the tampering.


Mulled Wine
(adapted heavily from Escoffier: Le Guide Culinaire and Bon Appetit)

2 750-ml bottles of red wine (it doesn't have to be fancy)
3/4 cup sugar
1 1/2 cups apple cider
2 cinnamon sticks
2 tangerines
16 - 20 whole cloves
1 tsp dried orange peel
pomegranate seeds for garnish

Pour the red wine over the sugar in a large, heavy-bottomed pot. Heat over medium-low heat, stirring occasionally, until the sugar is dissolved. Add the cider.

While the liquid heats, prepare the tangerines. Press the cloves (by the sharp end) into the tangerines, using about half the cloves for each tangerine. This way you don't have to strain out the cloves later on.

Place the tangerines, cinnamon sticks, and orange peel in the wine mixture. Heat until steaming, then cover and turn the heat down to low. Serve after twenty minutes, garnishing with pomegranate seeds (if using), and keep warm for second (or third!) servings.

Tuesday, December 11, 2012

5 ways to reuse Mason jars


Over the weekend Nina came over and we had another canning extravaganza (Cabernet Sauvignon jelly and pear & ginger preserves, for the curious). It's much more fun, and efficient, to can with another person, especially if you both prep your mixtures in advance. That way you can just reheat the jelly/preserves/jam on the stove while the water bath heats.

(We're thinking these will make excellent holiday presents.)


While they were in town on Saturday, Josh's parents were kind enough to give me this nifty journal (left) for logging all my canning adventures. Our previous goods will certainly make the cut, and I'm looking forward to filling up the journal with notes and photos of jewel-like preserves.

But the journal's cheeky cover got me thinking: what does a thrifty person do with all those leftover jars? Back in the homesteading days, no self-respecting cook would let those jars go to waste. Thankfully, we've got an abundance of crafty supplies and inspiration these days to make Mason jars even more useful. Here are 5 ideas:


1. Make a mini-terrarium. You'll want to layer in stones, a bit of sphagnum moss (both for drainage), potting soil, and tiny plants of your choice (or green moss). Spritz with water and set in moderate light (I have a few on my kitchen windowsill).

2. Store matches, buttons, or any other odd and end. I poured liquid dish soap into some old jars when the plastic container broke, and the jars make for a much prettier sink display.


3. Create an easy candle holder: wrap ribbon around the outside of the jar with a bit of glue and place a tealight inside.


4. Make mini-snow globes. Ever since Anthropologie came out with rather pricey Mason jar snow globes, the craft blogosphere has been buzzing with DIY instructions. I made mine this way: glue a craft tree to the underside of a jar lid. Spread a thin layer of glue on the rest of the lid's underside and sprinkle with buffalo snow. When the glue has dried, pour a small amount of buffalo snow (and glitter, if you like) into the jar, and carefully screw the lid back on the jar. The snow will spill a bit, but if you lay down newspaper you'll end up with a minimal mess.

5. Reuse your jar to preserve something else! You can reuse the jar and the ring--all you need to do is replace the flat lid with a new one (the seal needs to be fresh).

If you have any crafty ideas for reusing Mason jars, I'd love to hear.

Wednesday, December 5, 2012

How I blog (plus potato pancakes)


I'd like to pretend all my blog posts and series spill out onto the computer fully-formed. But like most of my writing, creating blog content is a slow, careful process. There's a lot of planning, rewriting, deleting, and then some more rewriting. Sometimes it's painful. Sometimes I'd rather take pretty pictures or read other people's effortless-looking blogs or go for a walk.

So, inspired by Joy the Baker's admirable honesty, today I'm going to give you a glimpse behind the curtain. This is how I made potato pancakes yesterday...and all the thinking and research that went into it.


Two Days Prior (Inspiration Time)

I start thinking about what I could make for the blog. I glance longingly at my pile of cooking magazines and the exciting East-West blend of Simply Ming that I got from the library. If only I could count Thai green curry sauce as historical. I suppose I could...if I knew more about Thai history and cooking.

Note to self: new blog series!

Then I talk myself down from starting yet another massive research project. I flip idly through The "Settlement" Cook Book and mark some cookie recipes. But Josh and I made Christmas cookies over the weekend, and we definitely can't eat them all plus more cookies. (Here Josh would say: "But, delicious!") So I read Bon Appetit instead.

inspiration!

One Day Prior (Research Time)

Adam Rapaport's article on the perfect latke makes my mouth water. I love potatoes. When a friend hosted a supper club several months ago, she and her sister waxed poetic about how potatoes would definitely be included in their last meals. I firmly agree. There is nothing like the potato.

Perhaps there's a similar recipe I could make for the blog. I flip through The "Settlement" Cook Book again, and lo and behold, there's a recipe for potato pancakes! And I could probably think of a good angle for the post...

But today we have leftovers, and I am fighting a cold that makes me feel like death warmed over. So I'll wait. I eat my pasta and imagine it tastes like potatoes.

(Can you tell I have an issue with leftovers? And that I was raised in a good Midwestern family with lots and lots of a certain root vegetable?)


Day Of (Cooking/Photo Time)

potato pancakes, posing with applesauce


My cold has significantly improved, and I leave school bounding with energy. When I get home I set up my equipment: ingredients, box grater, kitchen towel, fry pan, and of course, CD player. I'm going through a phase where I listen to dramatized Agatha Christie mysteries while I cook...it lends the whole enterprise an air of drama.

The Settlement recipe doesn't provide much in the way of guidance, so I open up Bon Appetit and skim the latke article. Rapaport recommends squeezing the grated potatoes to rid them of excess water--this sounds like a good idea. Then I make assumptions about the other instructions, based on what I know about frying up regular pancakes. I cut the ingredients from the Settlement recipe in half (it's only Josh and me, not our turn-of-the-century family of six) and get to work. The light's dying, so I do it quickly, hoping to get some decent natural-light photos in before the day ends.

But that's not to be, so I set up my kitchen table with seasonal linens and turn on the lamp for additional lighting. I spend the next ten minutes or so taking glamour shots of fried potato cakes.


One Day After (History Time)
New York settlement cooking class


Before school starts, I glance at the Wisconsin Historical Society's website for a reminder about the Milwaukee Settlement. I did the majority of my research for this project when I first started using the book, so most of this is familiar. But I want to confirm my suspicions that this recipe is for German Jewish potato pancakes, rather than for those of another culture. And indeed, I find that Lizzie Kander, the writer of The "Settlement" Cook Book, taught Jewish women how to cook at the Settlement, so I'm fairly certain that these potato pancakes could have been used in a turn-of-the-century Hannukah celebration.

So I gather my historical photos from more or less reputable sources, upload my own photos, and type up my thoughts. Plus the recipe, which is adapted heavily from the original (i.e. with actual measurements).

As you can see, it's a messy, time-consuming process. I'm sure many of you have developed much simpler ways of creating blog content, or perhaps you have your own elaborate methods. I'd love to hear!


Potato Pancakes
(adapted from The "Settlement" Cook Book and Bon Appetit's December 2012 issue)

4 russet potatoes, peeled
1/2 tsp salt
1/4 tsp baking powder
2 tsp flour
1 tbsp milk
2 eggs, beaten
vegetable oil, for cooking

Using the larger holes on a box grater, grate the potatoes. Dump the potato mixture onto a clean kitchen towel, wrap up the mixture, and carefully wring out the liquid over the sink. You may want to do this twice. Mix the dried potato gratings with the salt, baking powder, flour, and milk, and add the eggs at the end.

Heat a large skillet over medium-high heat, and pour in enough oil to cover the bottom of the pan. When the oil shimmers, drop the potato mixture in by spoonfuls and flatten with the back of the spoon. Cook about 4 minutes, or until brown and crispy, then carefully flip over the pancakes to brown on the other side, about 3-4 minutes. Remove cooked pancakes to a plate lined with paper towels.

Serve with applesauce.

Works cited: 1. Bon Appetit Magazine. 2. Elizabethian Tea.

Wednesday, November 28, 2012

Candied orange peel (with chocolate)


Thanksgiving is over. The turkey's been roasted and eaten (or perhaps you tried a duck?), the festive harvest plates have been washed and put away for another year. And now everything in America is telling us it's time for the winter holidays: the pharmacies selling mechanical Santas, the radios playing nothing but Elvis, the twinkle lights and pine garlands draping storefronts.

It's all going a little too fast for me. How is it the holiday season already? We just got into fall! (It doesn't help that my school is rehearsing and producing a play in the three weeks before winter break. December's going to go like lightning.)


I like to move slowly into winter, preferably with something delicious to ease the transition. There's hot chocolate, of course, and mulled wine (more on that soon). But lately I've been craving something tangy, a treat with zip.

This candied orange peel fits the bill. I first learned how to make it a few years ago when my mom decided to bake stollen, a traditional German holiday bread studded with dried and candied fruit. Her grandmother (intimidatingly nicknamed "TuTu") used to bake stollen every winter, and my mom decided that she was ready to take on the baking challenge. So we spent a long, cozy morning cutting up oranges and simmering the peel in a thick syrup, then chopping those candied peels to mix into the bread. It was one of those lovely surprises of the holiday season, when you learn that your parents have these hidden traditions they never told you about.

Personally, I prefer the candied orange peel just as it is, maybe with a bit of chocolate to really make it decadent. The French call these chocolate-dipped gems orangettes, and you can learn more about them from Molly Wizenberg's blog of the same name. They're shockingly easy to make. And they're just the thing to wake up your senses as you settle into a long, cold winter.


Candied Orange Peel (Orange Sticks)
(adapted from The "Settlement" Cook Book)

1 orange, scrubbed
1/2 cup plus 1 tbsp granulated sugar, divided
1/4 cup hot water
optional: 1/4 - 1/2 cup semisweet chocolate chips

To make the orange peel:
Score the orange lengthwise into four sections. Carefully remove the peel from the orange, making sure to keep each section in one piece. You should have four sections of peel. Carefully cut each section into narrow  slices, about 1/4 inch wide.

Place the slices in a medium saucepan and cover with water. Bring to a boil, then drain off the water. Repeat process four more times. This will blanch the bitterness from the orange peel.

Set aside the orange peel. In the same saucepan, mix 1/2 cup of sugar and the hot water and cook over low heat, stirring often, until sugar is dissolved. Place the blanched orange peel back in the pan with the simple syrup and stir to coat. Cook over low heat, stirring often, until the syrup is mostly evaporated, about 20 minutes.

Remove the orange peel from the saucepan and drain off the excess syrup (or pour it into your tea, as I did). Sprinkle the remaining tbsp of sugar over a flat surface and carefully roll the orange slices in the sugar, using tongs or a spoon, until coated. Place on a wire rack to cool.

For chocolate dip:
Melt the chocolate chips in a double boiler over medium-low heat. When the chocolate is just melted, dip the ends of the orange peel in the chocolate. Let cool on a piece of wax paper. 1/4 cup of chocolate chips will be sufficient for about half the slices.

Tuesday, November 20, 2012

The "First" Thanksgiving (III)


Last week we looked at some of the myths surrounding the original Thanksgiving. We've explored how the Pilgrims were not, in fact, Pilgrims, and how the First Thanksgiving wasn't the homey, pastoral scene we're taught in school. Today we'll look at the final piece of the puzzle: the idea that the Native Americans and the English colonists got along splendidly.


The Myth of Anglo-Native Cooperation

In 1621, the English colonists wanted to give thanks for surviving a terrible First Winter in the New World. Governor William Bradford ordered his men to hunt some wildfowl to cook at the feast. Massasoit, one of the sachems (leaders) of the local Wampanoag tribe, heard about the feast and brought a tribute of five deer to present to the governor. This was a sign that the Wampanoag respected the governor, and, by extension, the colonists he governed. Then Massasoit and many of his tribe members joined the English in their feasting, which lasted for 3 days.

Sounds perfectly cordial and lovely, right? Unfortunately, this feast was probably more like a wary meeting than a jolly mixer between ethnic groups. It was probably difficult for the colonists and Natives to communicate with each other, and the colonists were famously nervous about Native American dress, behavior, and habits. Even their methods of cooking food were different.


Similarly, the Wampanoag were probably suspicious of the colonists. In their first few months in the New World, the English hadn't treated the Wampanoag very well: members of their colony had "borrowed" corn and stolen personal items from the Natives. So this meeting between Massasoit and Governor Bradford may have been an attempt towards cordial relations between the two groups.

That's not to say that all interactions between the Natives and the colonists were negative. Earlier that spring, the Wampanoag had helped the English plant corn. This is where Squanto, the one Native we do learn about in elementary school, comes in. He taught the English how to deal with American soil and how to fertilize the corn, as well as what plants would grow well with it. After a long, harsh winter, the English were most likely relieved to have a friendly guide to this new land.


In the end, this 1621 Thanksgiving did not create peaceful relations between the colonists and the Wampanoag. It did not lead to annual feasts between the two groups--we've already seen that the colonists didn't approve of annual holidays. What's more, things steadily deteriorated between Natives and colonists until 1675, when King Philip's War broke out. After a bloody, vicious war, the English soundly defeated the Wampanoag forces and enslaved many of their women and children. The colonists then became the undisputed rulers of the Massachusetts Bay region.

The early conflicts between Natives and colonists were some of my favorite topics when I taught US History. They're a sobering example of how two groups were absolutely unable to understand each other, and therefore declared war on each other. It's heartbreaking to study the true history of the early colonies, because there are so many other stories like this one.

And though the Natives and the colonists were ultimately unable to cooperate with each other, their foodways still influenced each other. Colonial cooking bears the marks of Squanto's early efforts. Whenever colonial recipes call for cornmeal, they call it "indian meal," probably because they associated corn with the Natives who taught them how to grow it. So this pudding is a mixture of Old World and New, of English pudding and Native ingredients.

our full historical Thanksgiving feast (pudding in the foreground)


Indian Pudding
(slightly adapted from Giving Thanks: Thanksgiving Recipes and History, from Pilgrims to Pumpkin Pie)

1/2 cup water
1/4 cup cornmeal
2 cups milk
1 large egg
1 1/2 tbsp sugar
1/4 cup molasses
1 tbsp unsalted butter
1/2 tsp ground cinnamon
1/2 tsp ground ginger
1/4 tsp ground nutmeg
1/8 tsp salt

Preheat the oven to 300 F. Grease a medium ovenproof dish.

Whisk together the cornmeal and water in a small bowl until smooth. Scald 1 1/2 cups of the milk in a medium saucepan (heat until bubbles form on the surface) and whisk in the cornmeal mixture. Boil for 15 minutes until the mixture is thick. Remove from heat.

Beat the egg in a small bowl, and add several spoonfuls of the cornmeal mixture to the egg until it's smooth. Stir the egg mixture back into the saucepan. Add the sugar, molasses, butter, salt, and spices. Pour into the prepared dish and bake for 30 minutes.

Remove the dish from the oven and pour the remaining 1/2 cup of milk over the top. Don't stir it; just let it cover the top of the pudding. Bake for 2 more hours, until the pudding is set. Serve warm.

Friday, November 16, 2012

The "First" Thanksgiving (II)


This week and next, I'm exploring some of the myths about the First Thanksgiving. We've discussed how the Pilgrims were not, in fact, Pilgrims (they had much fancier terms for themselves back in 1621). We've looked at a bizarre recipe for sour stewed pumpkin. Today let's talk about the biggest myth of all: the story of Thanksgiving itself.

We like to think of the original Thanksgiving as a homey, elaborate feast out on the grounds of the new Plymouth colony. There are colonists and Native Americans dining together at long wooden tables, and little English children playing games with the Native children in the woods. The tables are groaning with pies, mashed potatoes, and roast turkeys. And at some point during the feast, the colonists thank God for their good fortune and count their blessings.

But that's not how it really went.


The Myth of Thanksgiving

Having survived a dreadful first winter, the English focused on building their village and planting crops. By the fall of 1621, they had a decent harvest of corn and other crops. It was an English tradition to celebrate the harvest with a big feast, so the English colonists probably decided to hold a similar, secular feast. Governor William Bradford decided to mark the successful harvest with three days of feasting somewhere between September and November of 1621. He sent some men out to hunt "wildfowl," or geese and ducks. Massasoit, a sachem (leader) of the Wampanoag, brought 90 of his men and other members of his tribe to join in the feasting at Plymouth, which lasted for three days.


However, this didn't become an annual event for the colonists. Remember, the Separatists didn't believe in traditional holidays. They did believe in the concept of "thanksgiving," a day where they thanked God for sparing them from some specific, dreadful fate, like a flood or a drought. They celebrated by reciting psalms, praying, and listening to sermons. There was probably food involved, but no special emphasis on feasting. So there were probably few Christian undertones to the harvest feast that took place in 1621.

The first religious "thanksgiving" to mark God's favor didn't occur until 1623, when the Separatists thanked God for ending a drought. But there was no feast mentioned in this account.

The original 1621 feast had a stronger spiritual undertone to the Wampanoag, who believed in thanking the Creator for food and good fortune throughout the year. The time between September 21 and November 9 was known as Keepunumuk, or the Wampanoag harvest time. So interestingly, "Thanksgiving" as we think of it today may have had its annual roots in Wampanoag tradition.


But it took some time for Thanksgiving to actually become a formal holiday for Anglo-Americans. It wasn't until the late 18th century that it had become an annual holiday, celebrated regionally. And not until 1863 did Thanksgiving become a national holiday, thanks to the efforts of Sarah Josepha Hale. Though well-intentioned, poor Mrs. Hale based her campaign on the erroneous assumption that the 1621 harvest feast was the "First Thanksgiving."

So at the heart of one of America's favorite holidays is a giant misconception.

Similarly, no one's certain that the colonists ate roast turkey at the 1621 feast. Yes, they ate "wildfowl," but that meant geese and ducks in the lingo of the day. There were turkeys in the Wampanoag lands at the time, so most historians think it's okay to include turkey in a recreated 1621 meal.

But I'm stubborn, so I cooked the fowl more likely to be at the feast: duck. I'd made duck only once before, and it had come out dry and tough, so I was hesitant. But this recipe, which involves boiling the duck in water before finishing it off in the oven, makes for a tender, juicy meat, mildly flavored with pepper and onion. The red wine sauce adds a sweet note to the rich taste of the duck. If you've never cooked duck before, this is so the recipe to start with.


Roast Duck with Cranberries and Wine
(slightly adapted from Giving Thanks: Thanksgiving Recipes and History, from Pilgrims to Pumpkin Pie)

For the duck:

1 4- or 5-pound duck
2 1/2 tsp salt
10 black peppercorns
1 onion, quartered
1/2 cup parsley leaves and stems, roughly chopped
2 onions, thinly sliced
1/2 tsp ground black pepper

For the sauce:
2 cups red wine
1/3 cup parsley leaves, chopped
1 tsp ground ginger
1/4 cup raisins, chopped
1/2 tsp ground mace
1/4 cup cranberries, chopped
1 tbsp sugar
4 tbsp unsalted butter, divided

Rinse the duck and remove any giblets and/or the neck from the inner cavity. Place the duck in a large pot (6-8 quarts) along with 2 tsp of the salt, peppercorns, quartered onion, and parsley. Pour in enough cold water to cover and bring to a simmer over high heat. Cover and simmer the duck for 45 minutes.

Preheat the oven to 400 F. Place the sliced onions in a roasting pan and remove the duck from the pot. Reserve the broth.* Sprinkle remaining 1/2 tsp of salt and the ground pepper over the duck and place it on top of the onions in the roasting pan. Roast at 400 F for 25 - 30 minutes, until clear juices run out from the duck when pricked with a knife.

Place 1 cup of the broth in a saucepan, along with the wine, parsley, ginger, raisins, mace, and sugar. Boil over medium-high heat until reduced to a syrupy mixture, about 20 minutes. When sauce is ready, stir in the cranberries. Add the butter one tbsp at a time. Serve the duck with the sauce at the table.


*Department of Not Wasting Food: You can reduce the remaining broth and freeze it as a stock to use later.

Tuesday, November 13, 2012

The "First" Thanksgiving (I)


With Thanksgiving little more than a week away, I've had cooking on the brain. No wonder--it's the only national holiday entirely devoted to food (plus, well, giving thanks). Is there anything more wonderful? I decided to honor the holiday by investigating its historic roots.

(And, as you know, I can't leave well enough alone.)

The results were fascinating. There are so many myths built up around this holiday that when you strip it down to its historical truth, there isn't much that's recognizable. We might as well call it The Thanksgiving that Wasn't. This week I'll be examining some of the bigger myths, along with recipes I used to cook a historical Thanksgiving for me and Josh (brave man).


The Myth of the Pilgrims

The English colonists who settled on Massachusetts Bay in 1620, the ones who famously landed the Mayflower on Plymouth Rock, weren't Pilgrims. They didn't call themselves Pilgrims at all. Instead they thought of themselves in two separate groups: Separatists, the religious ones who just wanted to worship freely, and "Strangers," the secular ones who wanted a fresh start in the New World. What's more, the Separatists wanted to be so separate from the English church that they refused to celebrate traditional holidays. So they began building Plymouth, their first village, on Christmas Day.

That First Winter in the New World was so awful that half of the original Mayflower passengers died. (There's an excellent portrayal of the harsh New World winters in Terrence Malick's The New World, which is about Virginia.) In the spring, the Native Wampanoag took pity on them and helped them plant corn. Squanto, a Native who'd been kidnapped and sold into slavery in Spain before making his way back to the New World, had learned English during his captivity and helped the colonists communicate with the Wampanoag. With the help of the local tribes, the colonists planted native crops like corn, squash, and pumpkins (called "pompions" back then), as well as English crops they'd brought with them.

Not surprisingly, most of the native crops fared much better than the English crops.

The colonists were actually intimately familiar with pumpkins; the vegetable had been introduced to Europe following the Columbian Exchange. They were sort of obsessed with pumpkins. They even wrote songs about how dependable pumpkins were. I am 100% serious. Stewed pumpkin was a staple in England, and the English just kept on cooking it in colonial New England.

Therefore, stewed pumpkin was definitely served at the 1621 harvest feast, and I replicated a traditional recipe for our own dinner. This version is sort of cheating because you use canned pumpkin rather than stewing a pumpkin over a fire all day, but you get the same effect. However, the strangest thing about this recipe is its liberal use of apple cider vinegar, which lends the pumpkin a sour sort of flavor. Josh and I were not at all sure about this. But you'll have to tell me what you think.


Stewed Pumpkin
(adapted from Giving Thanks: Thanksgiving Recipes and History, from Pilgrims to Pumpkin Pie)

2 cups canned pumpkin
2 tbsp unsalted butter
1 tbsp apple cider vinegar
1 tsp ground ginger
1/2 tsp salt

Heat all ingredients in a small saucepan over low heat, stirring to incorporate. Cook until the pumpkin is heated through, about 5-7 minutes.

Works Cited: Giving Thanks: Thanksgiving Recipes and History, from Pilgrims to Pumpkin Pie by Kathleen Curtin, Sandra L. Oliver, and Plimoth Plantation. Thanksgiving: The Biography of an American Holiday by James W. Baker.

Monday, November 5, 2012

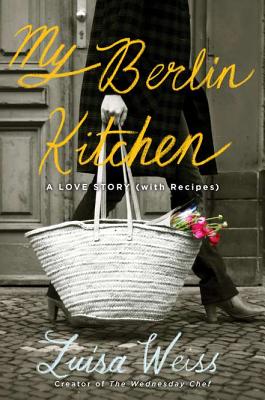
Luisa Weiss' My Berlin Kitchen

You know how there are books that grab you from the first page? You think to yourself, This is me. I see myself in this story. This was my experience with Luisa Weiss' memoir My Berlin Kitchen. I was so enthralled that I actually read the book as slowly as possible rather than zipping through it, in hopes of soaking up every word and turn of phrase.

Weiss is the creator of the popular Wednesday Chef blog, and in this memoir she recalls growing up in Boston and Berlin, splitting time between her divorced parents. Her childhood gave her a perpetual sense of homesickness, and as she learned her way around a kitchen, she began cooking as a way to reconnect with the people and places she loved. She writes simply and beautifully about trying to find her way in the world after college: her difficulties living in Paris, settling down to a publishing job and a fiance in New York, only to realize that she really wanted to be back in Berlin, where her life began. With incredible courage she said goodbye to her fiance and returned to Berlin. There she rekindled a relationship with Max, a former love who truly understood how torn she was between cultures.

My Berlin Kitchen tells a sweet and heartfelt love story, but at its core it's about belonging and how food can help create a sense of place. I recognized Weiss's decision to make Depression Stew when she felt so alone in Paris, a sort of home remedy against loneliness. I smiled at her dilemma over what to make for breakfast--cereal, pastries, or open-faced sandwiches? (Though my dilemma is not brought on by a jet-setting childhood, merely the inability to choose between so many delicious options.) And when she bought a goose for her first full German Christmas, I cheered along with her when she roasted a perfect bird.

Sometimes I feel torn between my Ohio hometown and my adopted home on the East Coast, and I've spent plenty of time working out strategies to prevent homesickness in one city or the other. My first year out of college, spent in New York City, was particularly brutal. But like Luisa Weiss, I found that cooking actually helped assuage some of that loneliness. For me it was less about recreating the tastes of home and more about keeping myself company; I could put on a DVD and cook an elaborate dinner, just for fun. Since I've started this blog, though, I've been discovering the ties between family and food. Baking a pie will remind me of my dad's stories about exploding pumpkins, or frying fish will make me think of my grandmother's careful instruction on gutting fish. Making something delicious in the kitchen can bring you closer to the people you love.

I had the great pleasure to see Luisa Weiss in person when she did a book signing in Boston, and she's just as charming and genuine as her writing. If you have a chance to pick up her memoir, do. It's one of the best books I've read all year.

(Plus, she learned how to cook by working her way through The "Settlement" Cook Book, and she grew up reading Little House on the Prairie! It's kismet.)

Tuesday, October 30, 2012

Canning: Apple butter


We're safe and sound here in Providence. The hurricane swept through yesterday and we stayed snug in the apartment, catching up on schoolwork and relaxing. There were several hours of Diablo III (Josh) and of baking cheesy pull-apart bread (me). There was an evening of catching up on our favorite shows and watching The Adventures of Tin-Tin. And today the weather's clear and sunny, but we're still off from school while Rhode Island pulls itself back together.

Just like last year when Irene stopped by, we were extremely lucky not to lose power or face flooding. These two days off from school have been more like surprise snow days (minus the snow) than anything scary, and I'm thankful for that.

If you're still battening down the hatches to weather out the rest of the storm, or if you're just hankering for a comforting, homey taste of fall, might I suggest some apple butter? Freshly made over the weekend, this apple butter spiced up my morning oatmeal and kept me warm long into the day while the wind screamed outside. It's just what I needed to get ready for the colder months ahead.


I adapted this recipe from Liana Krissoff's excellent Canning for a New Generation, so it's not technically a historical recipe. Krissoff helps you bypass the labor-intensive parts of making apple butter the traditional way, allowing you to slow-cook the butter in the oven instead of stirring it constantly on the stove. Still, the hours spent in the oven imbue this apple butter with a spicy, old-fashioned goodness. Once the apple butter was thick and dark, Nina came over to help pack it up in half-pint jars. (This canning thing is becoming a habit of ours.) We also put up some applesauce she'd made the day before, and we ended up with a pretty decent haul. If we don't hoard our cans all winter long (trust me, it's tempting), we're thinking they'll make excellent gifts come the holidays.

Stay safe, friends, and help yourself to some apple butter.

Do you have any tips for making it through storms and snow days? I'd love to hear.


Apple Butter
(adapted from Canning for a New Generation by Liana Krissoff)
makes between 6 and 10 half-pint jars

6 lbs apples, peeled and cored and chopped into small pieces (I used a combination of Macintosh and Granny Smith)
2 cups apple cider
roughly 1 1/2 cups brown sugar
1 1/2 tsp ground cinnamon
1/2 tsp ground cloves
1/2 tsp ground allspice

Put the apples in a large saucepan, together with the cider and 4 cups of water. Boil over high heat, stirring occasionally, until the apples are mostly mushy and broken down, about 40 minutes. Puree the mixture in batches in a blender until smooth, and measure before pouring it into a medium Dutch oven. Preheat the oven to 300 F.

Into the apple mixture, stir in 2 tbsp brown sugar per cup of puree (this is why you measured it earlier). Stir in the spices. When the oven is hot, bake the apple mixture for about 2 hours, stirring occasionally, until it's thick and dark and the kitchen smells of spice.

If you'd like to can the apple butter (this recipe makes a lot), set a canning pot full of water to boil on the stove. Wash the jars and lids you'll be using, and set the jars in the canning pot to keep them hot. Put the lids in a heatproof bowl and ladle some of the hot water from the canning pot into the bowl to cover the lids.

Remove the apple butter from the oven and set on the stove over medium heat until it's boiling. Once the canning pot is boiling, remove the jars from the pot with a jar lifter and place them upright on a towel. Remove the jar lids from the bowl and set on a plate.

Working quickly, pour the apple butter into the jars, leaving about 1/2 inch headspace in each jar. Place a lid on top of each jar and lightly screw on the ring, so it holds but is still loose. Use the jar lifter to return the jars to the canning pot, making sure they're upright and covered by at least 1 inch of water. Bring the canning pot to a boil and process for 10 minutes. Remove the jars and place on a towel. Check the lids to make sure they've sealed after 1 hour (when you press the center of the lid, it shouldn't push down or pop back up). If any haven't sealed, refrigerate immediately. Don't move the sealed jars for 12 hours. When they've finally cooled, label and store.

Thursday, October 25, 2012

History 101: Downton Abbey

While Downton Abbey is purely fiction (in all its soap operatic glory), it's based largely on fact. Julian Fellowes, the creator of the show, is known for writing well-researched films set in earlier days of the British Empire (like Gosford Park, one of my sister's favorite movies). Downton Abbey is no different. That intrigue and scandal is all layered on top of historical fact.


Time Period

The show begins with the sinking of the Titanic in 1912 and proceeds through the end of World War I, and season 3 will take us into the 1920s. These decades held loads of change for Britain. Until 1900, Britain was the undisputed leader of the Western world, with Queen Victoria at the helm and colonies scattered around the globe. "The sun never sets on the British empire" and all that. Yes, there was a huge gap between rich and poor in England itself, and the aristocracy was struggling to maintain its position at the top of the social ladder, but few Victorians thought things would change in the 20th century.


Edwardian England and World War I

Enter King Edward VII, who came to the throne upon the death of Queen Victoria in January 1901. Here are a few important facts about Edward:

  • he enjoyed spending weekends with the landed aristocracy at their country houses (like Downton)
  • he enjoyed lavish parties at these country houses
  • his nickname was Tum Tum (not really important, but I couldn't resist sharing)

Sure, he was a perfectly fine ruler. But mostly people focused on his love of parties. The aristocracy thought of these years before WWI as a "golden summer" because they modeled their lives after Edward's, spending weekends at shooting parties and eating elaborate 10-course meals. They didn't think much about the working class, who were often so poor and so nutritionally-deprived that they couldn't be drafted into the army. The fact that the working class was beginning to take power in Parliament, through the formation of the Labour Party, escaped the wealthy.

Edward VII at Balmoral
The one thing the gentry did notice was the fact that their power and wealth no longer rested on their land and estates, as it had for centuries. Now they had to pay high taxes on their land, and their tenants could purchase pieces of the estates. Some families became so broke that they had to sell to the nouveau riche or find wealthy American heiresses for their sons (like Cora). A major social shift was on the horizon.

Of course, WWI changed everything even more. Suddenly all of Britain's able-bodied men were sent to the front in France or the Mediterranean, and few came back unscathed. The war years even influenced those left at home, like Lady Sibyl, who decides that she'd prefer working as a nurse and running away with the chauffeur to remaining at Downton. By the end of WWI, the social order was completely upended.


How it All Relates to Cooking

Since much of the show is set at a country house, most of the food we'll discuss is pretty high-class. The aristocracy ate elaborately and well, and the servants ate their leftovers or simpler meals. However, the servants were much better fed than most of the working class in the Edwardian era--they could rely upon having at least something to eat at every meal.

the Crawleys at a garden party
The landed class particularly enjoyed modeling their dining habits after those culinary geniuses, the French. Edward made it fashionable to eat 10-course meals, so that's what the landed class did, dining on French-inspired food cooked by trained French chefs. While I can't see Mrs. Patmore, the cook at Downton, training in a French kitchen, she certainly would have cooked French food for the family. For more traditional English recipes, she would have turned to Mrs Beeton's classic cookbook. Finally, ingredients before the war would have been the very best, and often the vegetables came from the estate's farm. Talk about eating local!

However, even the gentry had to give up their rich foods when WWI broke out. Britain depended on imports for 60% of its food supply, so the war at sea made acquiring food incredibly difficult. Prices for sugar, butter, and cheese skyrocketed when war was declared, and the government had to ration food early on. This forced cooks to be much more creative, but it also made for some truly distasteful dishes. For now, I'm going to focus on food before the war.

In a future post I'll talk about the cookbooks I'm using for this project, but for now, be prepared for lots of fancy French food with fancy French names, as well as some classic Victorian dishes.

Downton lovers, what's your favorite thing about this time period? I'm fascinated by Edward VII's nickname...


Works cited: Taste: The Story of Britain through its Cooking by Kate Colquhoun. Life in Edwardian England by Robert Cecil. Images: 1. Ye Olde History Tavern. 2. TV with Thinus.

Monday, October 22, 2012

Pumpkin pie


This time of year, Led Zeppelin's "Ramble On" always seems to be stuck in my head. Yes, I did play it in class because it connected to our Lord of the Rings discussion, but it's also just so seasonally appropriate. "Leaves are falling all around....time I was on my way." It's the perfect thing to sing while crunching through the gold and red leaves on the sidewalk.


Erin of Reading My Tea Leaves made the funny, and true, observation that bloggers are totally obsessed with the seasons. These days, blogs are all about spiced apples and warm cider and crisp fall days. I'm guilty of this, too. But it seems appropriate that blogs about food and simple living--the ones I read--are focused on the seasons and their changing, because in many ways we're still closely tied to the land and the weather. Maybe we aren't farmers, but many of us purchase food from farmers' markets, and our meals therefore depend on what's in season. Our outdoor activities, the shapes of our days, our clothing--all determined by the seasons. It's a lot easier to run down the block for a morning coffee when the weather's still crisp and cool, not yet biting. And I always find myself heading outside more often in every season but winter. For some reason, bundling up in scarves and puffy coats makes venturing outside for a walk just a bit more difficult.


With that in mind, I've been trying to enjoy these last days of beautiful autumn. We've been lucky in Providence, with golden days and warm temperatures and just a few cold snaps in between. It's perfect weather for picking apples and going for long walks and sitting on the porch with hot mulled cider (see? I can't get away from it!).


Last weekend, filled with the spirit of fall, Josh and I headed out to Seekonk to pick pumpkins. The pumpkin picking itself was majorly disappointing; picture a field dotted with pumpkins already plucked from the vine, so little kids didn't have to work too hard. But we had fun walking around the farm, getting lost in the corn maze, and talking to goats. (Josh hates goats, by the way--the shape of their pupils makes them look evil or something.) Then we loaded up on carving pumpkins, decorative gourds, and a sugar pumpkin for baking.


Back at home, we carved some impressive jack-o-lanterns, which proceeded to mold within one week (damn this warm weather!). The sugar pumpkin I cut into pieces and baked in the oven, until it felt soft under the touch of a fork. (I made sure not to follow my dad's example, where he stuck an entire, whole pumpkin in the oven to roast. He realized that something was wrong when he heard a bang and found the entire kitchen covered in pumpkin guts.)


Baked pumpkin looks a little yellower than the canned stuff, but it tastes just as good. Fresher, even, though that may be my imagination. Pureed, it goes nicely in an old-fashioned pie. I returned to Little House on the Prairie for this one, because there's just something about fall and harvest time that makes me long for the Ingalls family. And Ma Ingalls did not disappoint. This is a simpler pie than pumpkin pies we make today--fewer eggs, less milk. Prairie housewives wouldn't have much spice on hand, so I used just a dash of cinnamon, cloves, and ginger.


The best thing about it? Instead of covering up the squashy taste with sugar and intense spice, the flavorings only enhance the pumpkin, so the pie tastes like...well, a pumpkin pie. But not the sweet custard kind. The kind where the pumpkin is the starring ingredient.

Tell me, what are your favorite things about fall? What foods do you find yourself making this season?


Pumpkin Pie
(adapted from The Little House Cookbook)

for the pie shell:
1 1/4 cups all-purpose flour, plus more for dusting the work surface
1/2 tsp salt
6 tbsp butter, cubed
3 tbsp ice water

for the filling:
2 cups pumpkin puree (homemade or canned)
2 eggs
2/3 cup brown sugar
1 1/4 cup rich milk or half-and-half
pinch of salt
1 tsp maple syrup
pinch of spices (I used cinnamon, cloves, and ginger)

Make the pie shell:
Sift the flour and salt together, and with the tips of your fingers, work the butter into the flour until it feels like coarse meal. Add the ice water 1 tbsp at a time until the dough comes together when you work it with your hand. Turn out onto a floured surface and roll into a flat circle. Transfer to a 9-inch pie pan and even out the sides. Let sit while you make the filling.

Make the filling:
Preheat the oven to 425 F. Beat the eggs in a large bowl, then add the brown sugar, maple syrup, milk, salt, and pumpkin until well blended. Pour into the pie shell.

Bake the pie in the center of the oven at 425 F for 10 minutes. Then reduce the heat to 350 F and bake until a toothpick inserted into the filling comes out clean. NOTE: the baking time will vary depending on the fat content of the milk you use. I used 1%, which took about an hour and a half to bake total. With half-and-half, the baking time should be about 40 minutes.

Cool pie before serving.